Topic: Programming
Online Help
Input forms
If you have long and complicated problem or you want to share your solution with others, it is a good idea to create an input form. It is very easy to do that with Calcpad. Just replace the values that need to be entered with question marks "?", e.g. "a = ?". Please note that after that, you will not be able to calculate the results directly by clicking  . You must compile it first to an input form. For that purpose, click the
  button or press F4 from the keyboard.
The code will hide and the form will be loaded into the "Input" box at the full width of the main window. All texts and formulas will be rendered in Html format, protected from modification. Input boxes will be generated at every occurrence of the "?" symbol except those in comments. The ready-to-use input form will look as follows:
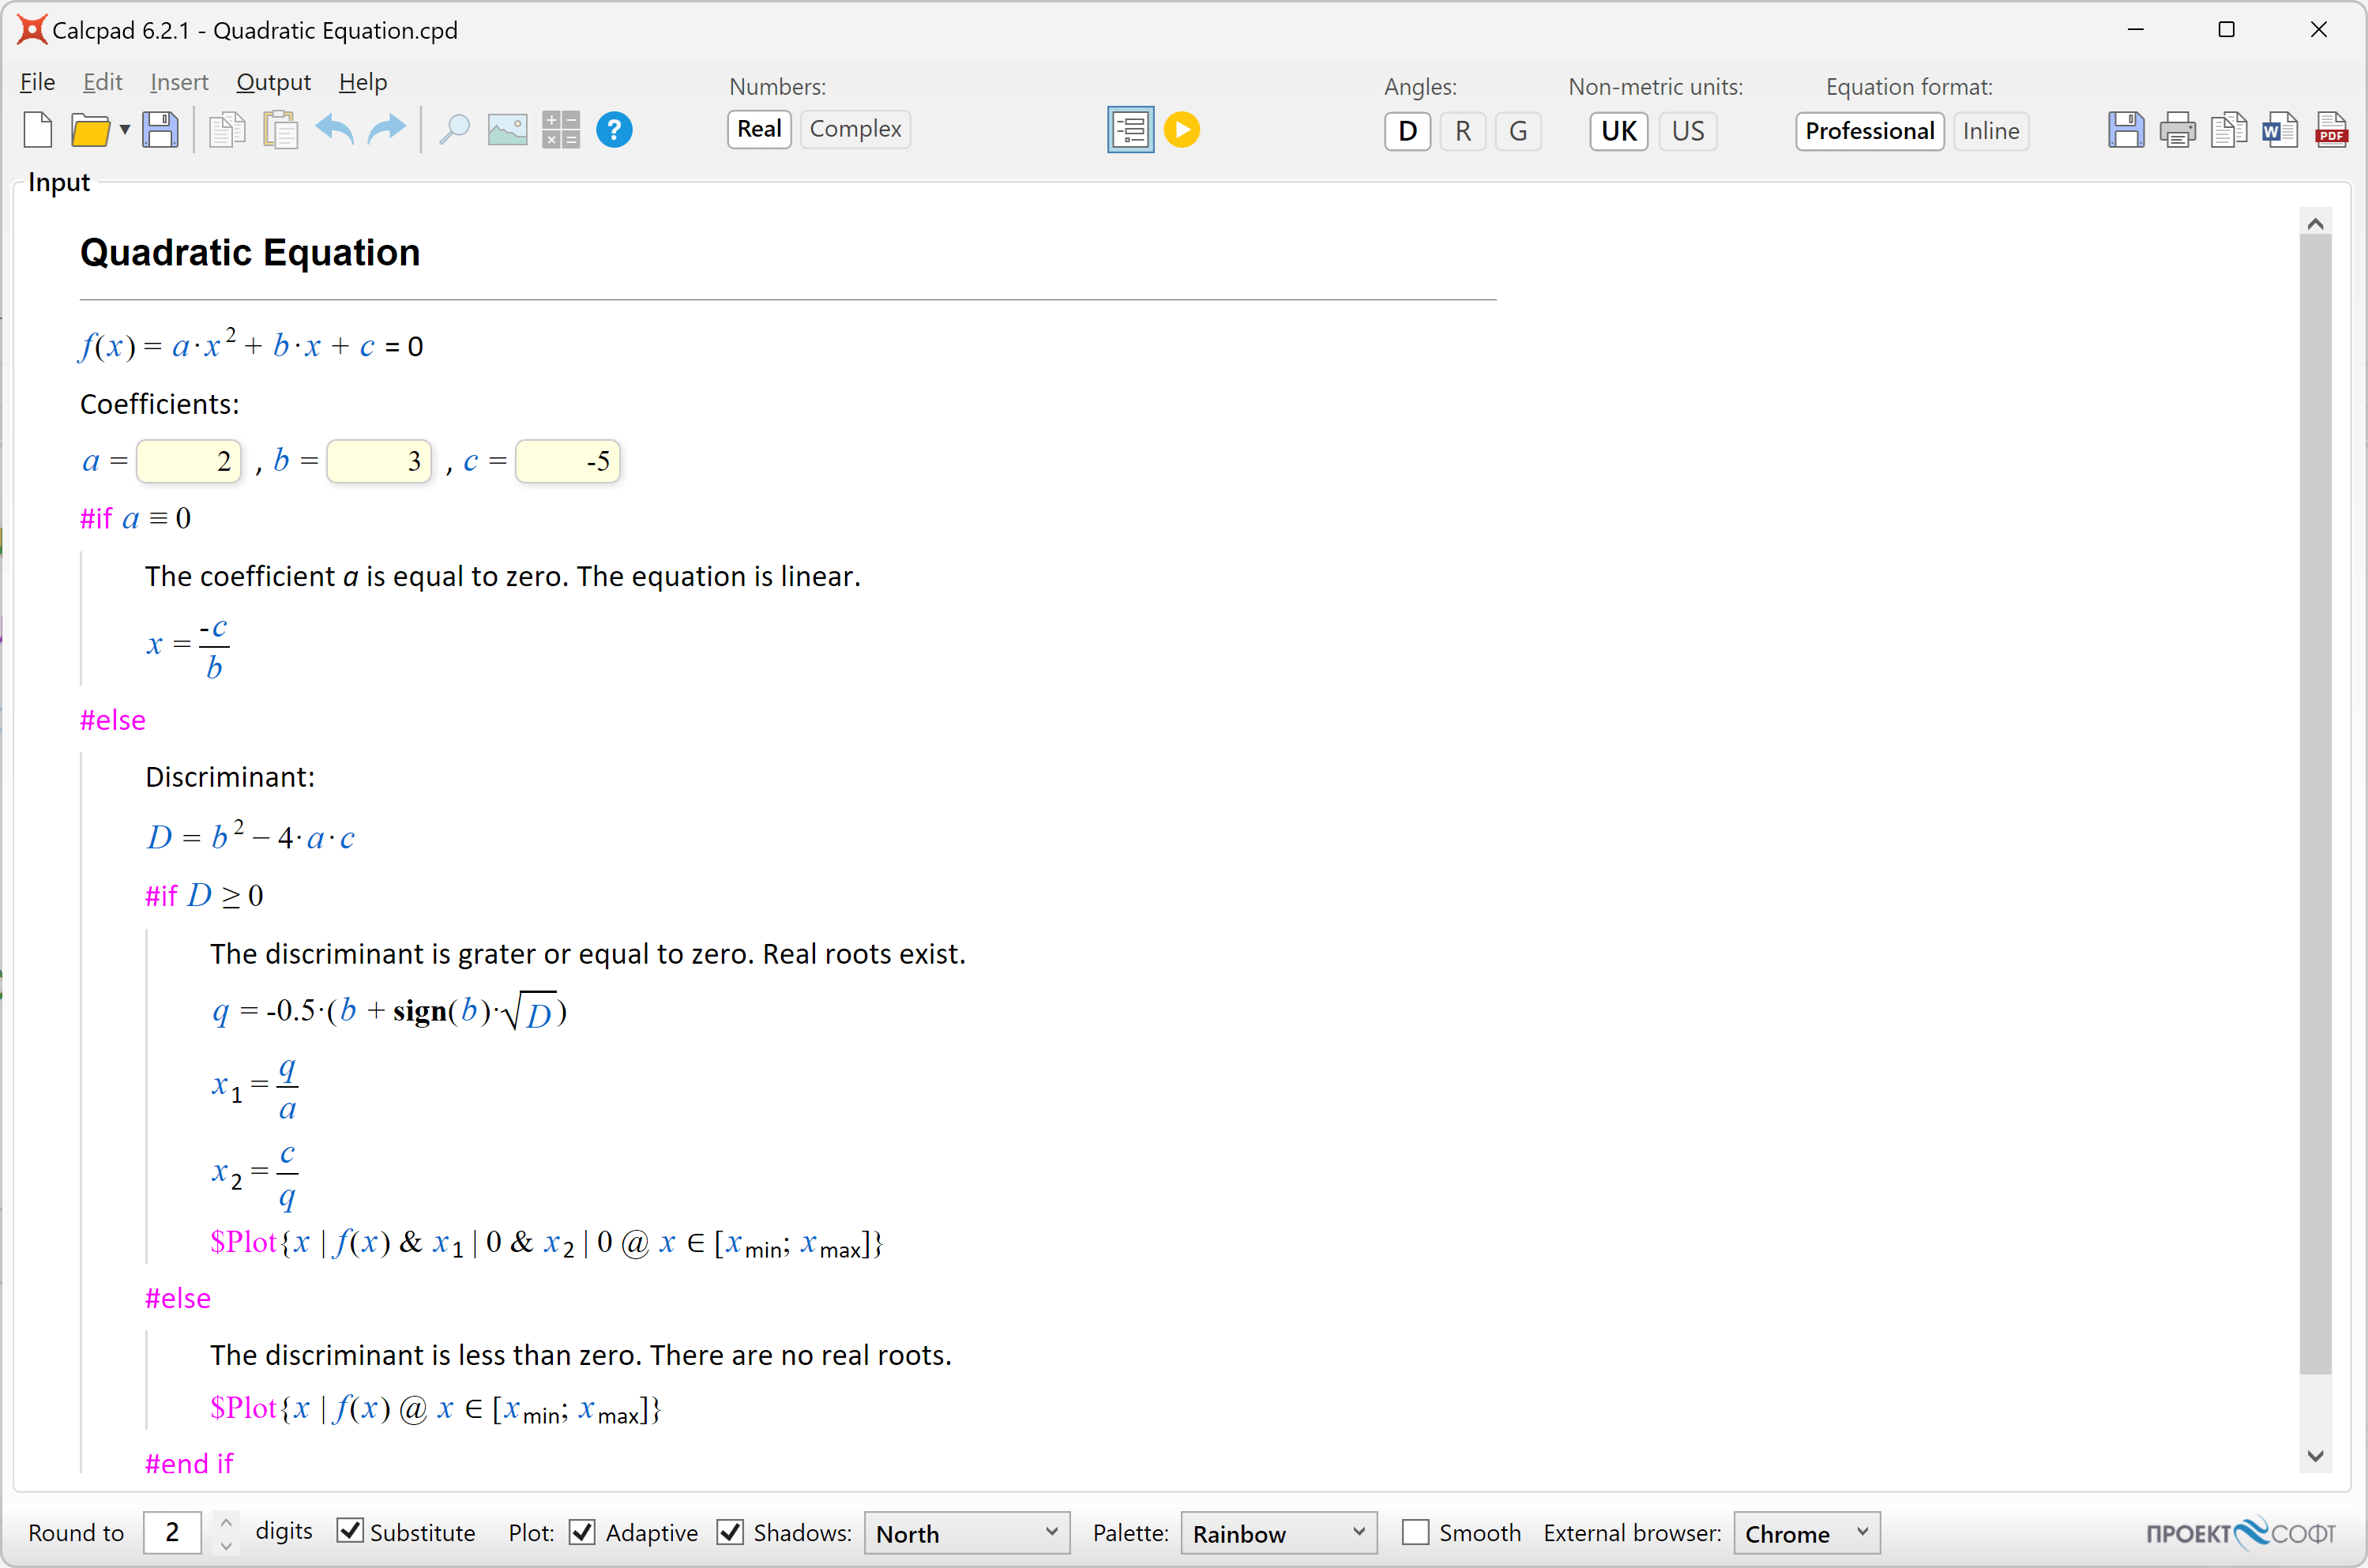
Now you have to fill the input boxes and click to calculate the results. They are displayed in the "Output" box.
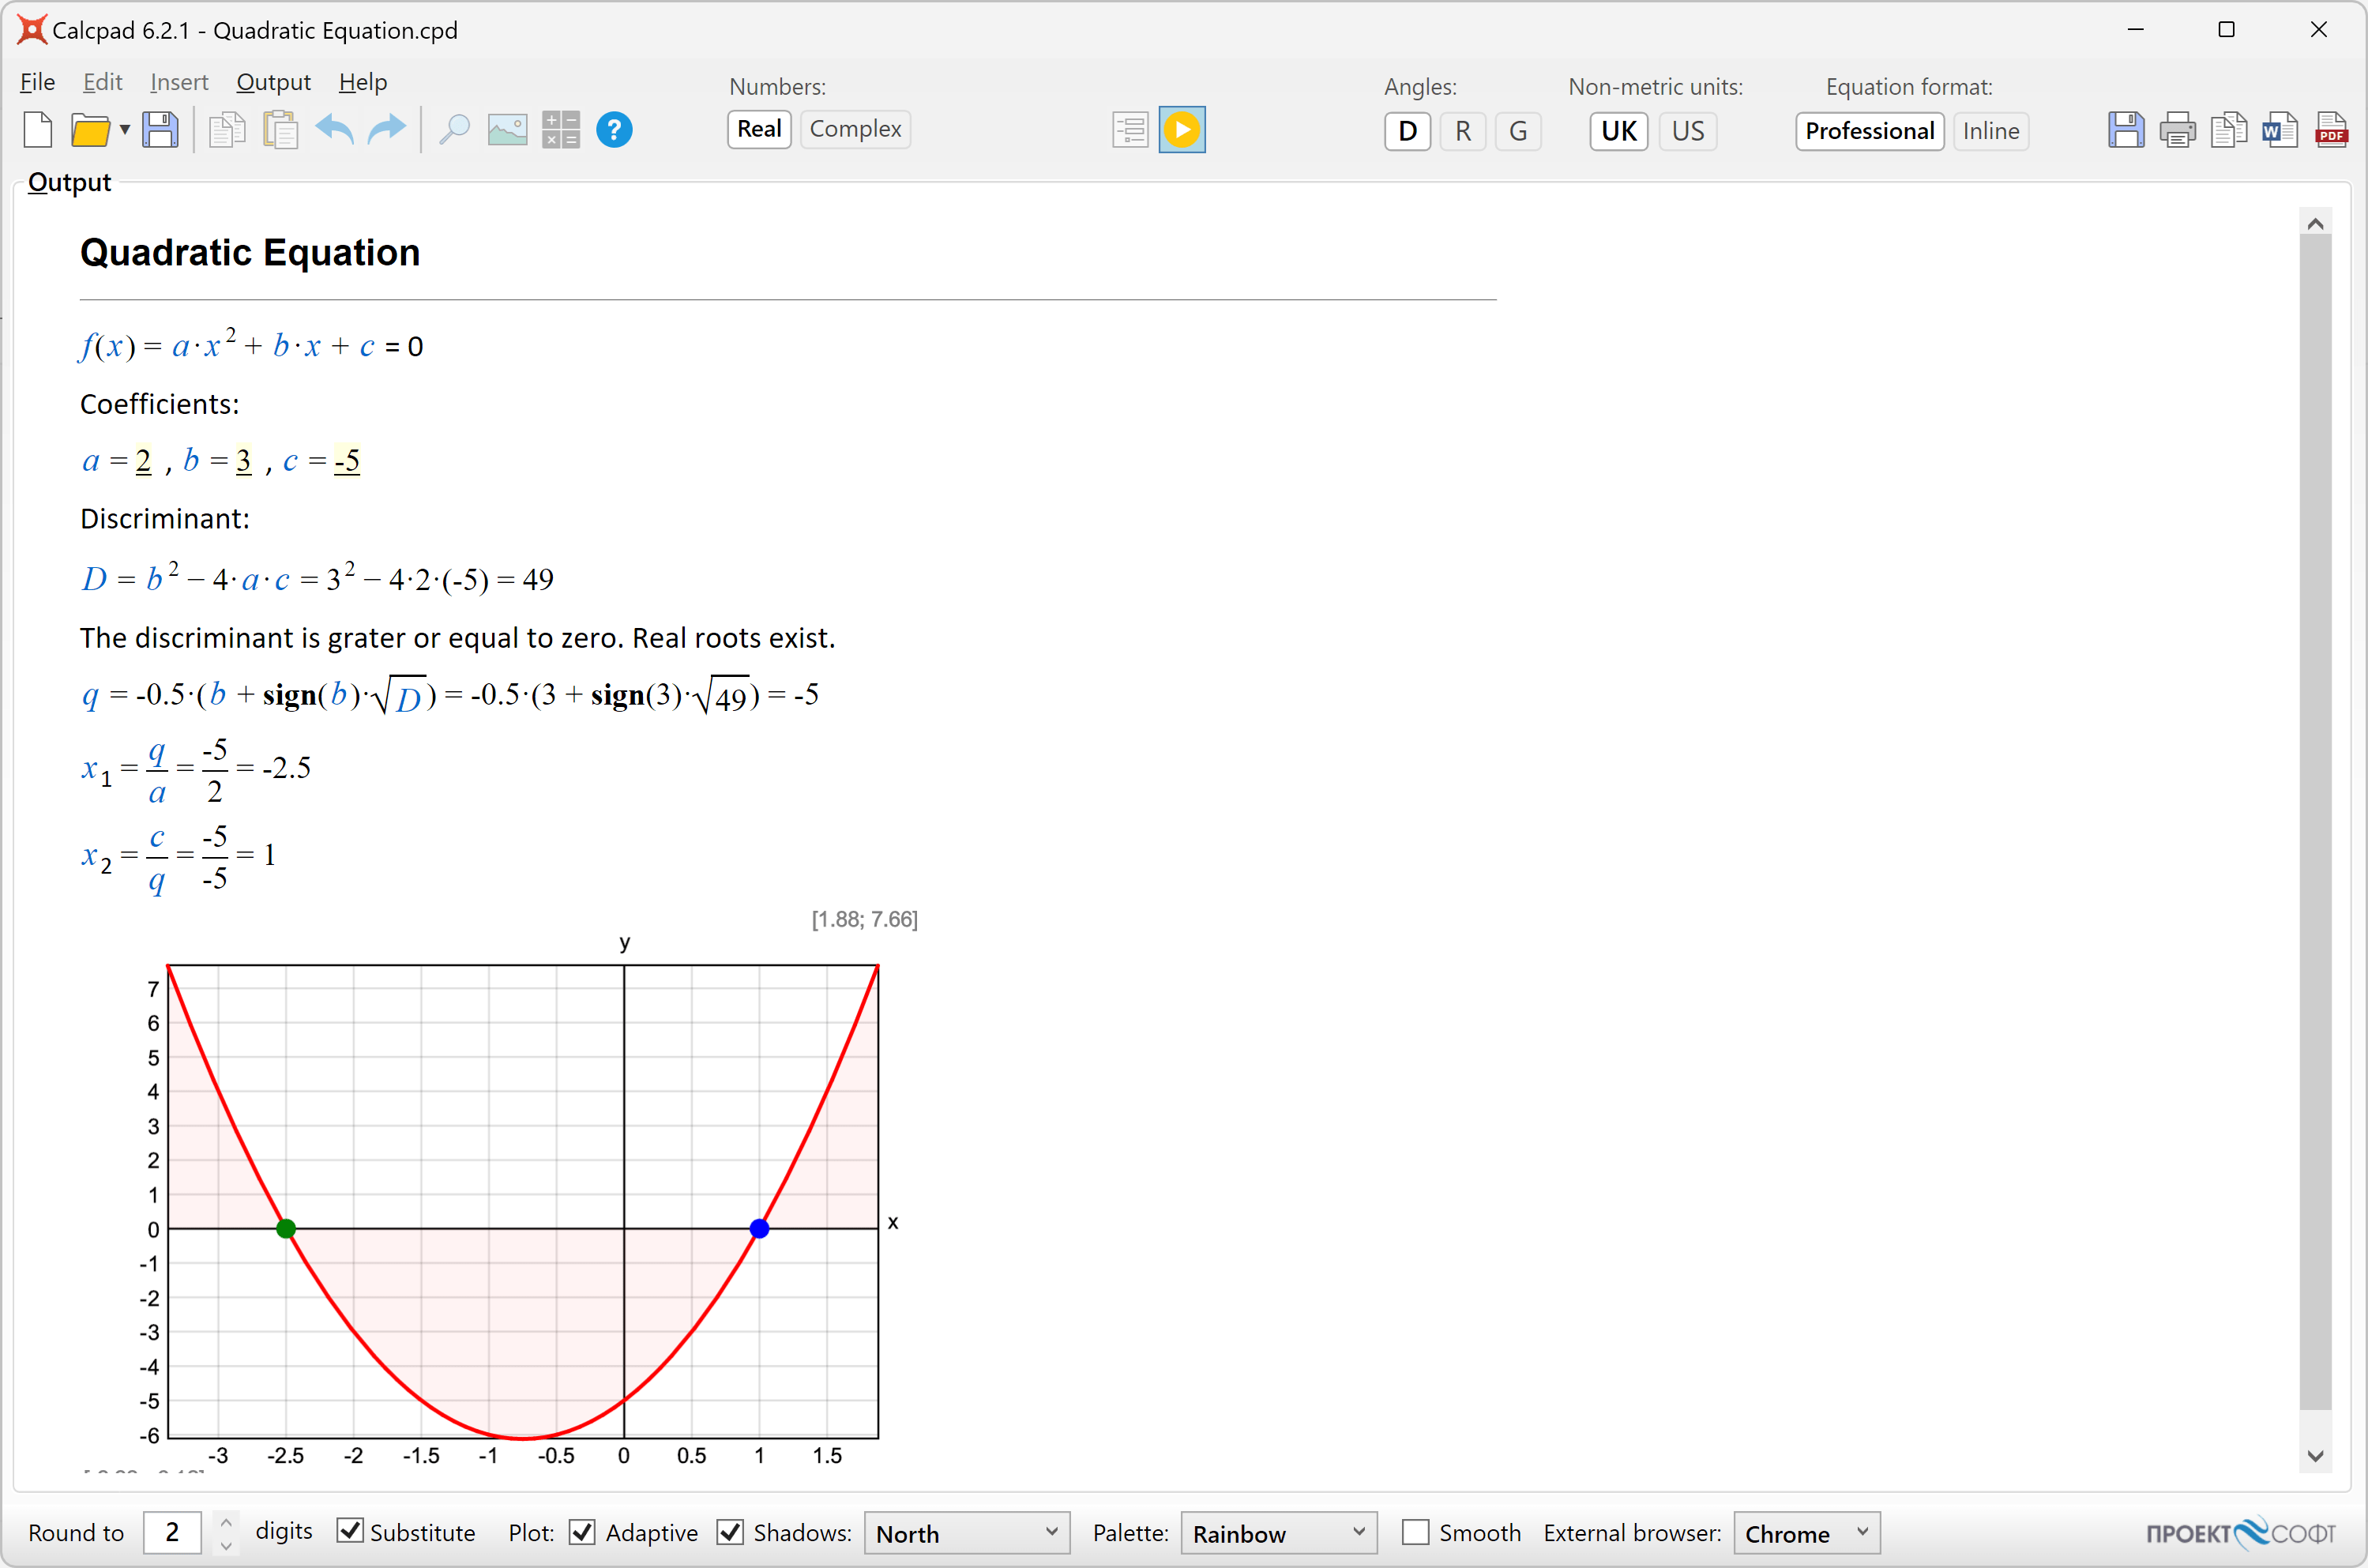
In order to return to input mode, click again to switch the button off. Input data will remain unchanged since the last input. If you need to modify the source code, you have to unlock it by clicking the button. The "Code" box will show again at the left side of the main window. Input data will be attached to the question marks. If you hover the mouse over one of them, you will see the respective value. Click on the question mark to change it. When you finish editing the code, you can compile it back to input form. The input values will be filled in the respective fields. Finally, you can save the document as a "*.cpd" file. When you open such file, it will be displayed directly into input form mode. This format is more convenient to use than a simple text file due to the following advantages:
- The user can see clearly which parameters should be entered. You can also provide pictures and additional explanations. This is more comprehensible for the user, especially if the program is developed by someone else;
- The rest of the source code is protected from modification, unless you unlock it on purpose. This prevents an inexperienced user to accidentally damage the calculation formulas.
If you save the document as a "*.cpdz" file, you will make the source code completely inaccessible. It will not be possible to unlock it inside Calcpad anymore. Also, no one could edit the file in external text editor, because it is encoded. That is how you can protect your source code from unauthorized coping, viewing and modification.
You can put question marks "?" not only in variable definitions, but at any place in the code e.g.:
2 + ?
2 +
Then, you can enter a value and calculate the result. This approach is not recommended for complicated problems, because the program logic gets unclear and difficult to understand.
Advanced UI with Html and CSS
Besides simple input boxes, you can use some advanced UI elements like "select" (combo box), "radio" buttons and "checkboxes" in your worksheets. Since all the output from Calcpad is rendered as an Html document, you can use Html and CSS for that purpose. However, Calcpad accepts input only from text boxes. That is why, it is required to map every other UI element to some text box. This is performed by enclosing the text box into an outer html element (paragraph or div) with a certain id. The same id must be assigned as a name or data-target attribute of the source UI element. Then, the content of the source element's value attribute will be automatically filled in the target text box. You can use the following sample code:
Selection box:
Code:
  'Select an option: <select name="target1">
  '<option value="11;12">x1; y1</option>
  '<option value="21;22">x2; y2</option>
  '<option value="31;32">x3; y3</option>
  '</select>
  '...
  '<p id="target1"> Values:'x = ? {21}','y = ? {22}'</p>
Output:
Select an option:
...
Values: x = , y =
Radio buttons:
Code:
  '<p>Select:
  '<input name="target2" type="radio" id="opt1" value="1"/>
  '<label for="opt1">option 1</label>
  '<input name="target2" type="radio" id="opt2" value="2"/>
  '<label for="opt2">option 2</label>
  '...
  '<p id="target2">Value -'opt = ? {2}'</p>
Output:
Select:
...
opt =
CheckBox:
Code:
  '<p><input name="target3" type="checkbox" id="chk1" value="3"/>
  '<label for="chk1">Checkbox 1</label></p>
  '...
  '<p id="target3">Value -'chk = ? {3}'</p>
Output:
...
chk =
As you can see from the first example, one "value" attribute can contain multiple values, separated by semicolons ";". In this case, you have to provide the respective number of text boxes in the target paragraph. You can copy the above code, add as many options as you like and write your own labels and values. You can also change names and ids, but make sure that all source names match exactly the target ids and no duplicate ids exist.
Input of vectors and matrices
In Calcpad you can generate UI controls not only for input of scalar values, but also for vectors and matrices. The syntax is very similar to the one used for scalar values:
Vector input - a = v? |
a = Table:
Output: [0] |
||||
Matrix input - A = M? |
A = Table:
Output: [0] |
As a result, an editable table is generated that allows you to enter values. Above the table, you will find size controls where you can specify the number of rows and columns. Below the table, the generated output code for calculations is displayed. You can also predefine fixed sizes for vectors and matrices inside the code. In this case, the respective size controls are not displayed. Predefined sizes should be placed in brackets immediately after the question mark. Exactly one value is allowed for vectors (cols) and one or two values for matrices: (rows) or (rows; cols). If one value is specified for a matrix, it is assumed to be the number of rows and the number of columns is taken to be = 1 (column matrix). If a value is zero, it is considered unspecified (not fixed and free to modify).
Vector with size - a = v?(4) |
a = Table:
Output: [0; 0; 0; 0] |
||||||||||||
Matrix with sizes - A = M?(2; 3) |
A = Table:
Output: [0; 0; 0 | 0; 0; 0] |
||||||||||||
Column matrix with fixed rows - A = M?(3) |
A = Table:
Output: [0 | 0 | 0] |
||||||||||||
Matrix with fixed cols - A = M?(0; 3) |
A = Table:
Output: [0; 0; 0] |
||||||||||||
Matrix with fixed rows - A = M?(3; 0) |
A = Table:
Output: [0 | 0 | 0] |
You can also specify initial (default) values for some (or all) elements of a vector/matrix. You can combine them with fixed sizes or specify only default values. In the second case, the initial sizes will be determined by the default values, and will not be fixed. It is not required the number of default values to match exactly the fixed sizes if specified. If they are less, the remaining elements are filled with zeros. If they are more, the excess values are just skiped. The default values are specified in square brackets using the standard vector/matrix definition syntax:
|
Vector with default values -
|
a = Table:
Output: [1; 2; 3] |
||||||||||||
|
Vector with fixed size
|
a = Table:
Output: [1; 2; 3; 0] |
||||||||||||
|
Vector with fixed size
|
a = Table:
Output: [1; 2; 3] |
||||||||||||
|
Matrix with default values -
|
A = Table:
Output: [1; 2 | 3; 4] |
||||||||||||
|
Matrix with fixed size
|
A = Table:
Output: [1; 2; 0 | 3; 4; 0] |
||||||||||||
|
Matrix with fixed size
|
A = Table:
Output: [1; 2 | 4; 5] |
Although not required, it is good practice to specify default values. They are also useful for testing purposes. Otherwise, you will get an error for undefined input, if you run the calculations directly without going through the input phase first.
Table of contents
-
+
About Calcpad
-
+
Writing code
-
+
Coding aids
-
+
Expressions
-
+
Reporting
-
−
Programming
-
+
Results
-
+
Working with files